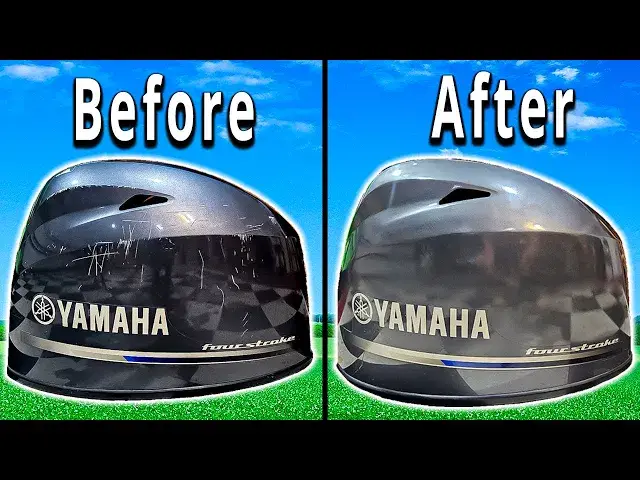
0:04
That's unfortunate. Because I'm lazy, I do want to show you how to fix these scratches first, then we'll fix all of these over here
0:12
This is a cow finish compound, removes minor scratches while providing a high gloss finish
0:17
Pretty simply to shake this stuff up. Put a little bit on the caling there, you know, like that, not bad
0:22
Take a rag like this and clean it off. And just like that, it has pretty much removed some of those
0:29
minor scratches now you can see some of the deeper ones like this there's another way
0:35
to do this oh man look at this this is just shot you will need a polisher or
0:42
something like this with a pad kind of like this and all we'll do is put some of our
0:47
stuff on there we'll put it on the cowling And as you can see, that has removed pretty much all of the minor scratches
1:04
Now, depending on how deep it is, you can use more of this stuff or less of this stuff
1:10
You might have to get different types of polishing pads in order to really cut through the scratches
1:15
But by and large, just a simple polisher and the compound will take care of all of your minor scratches
1:22
Now, when it comes to this stuff over here like this, or even this over here
1:29
This is all pretty bad. These you cannot buff out with a polisher, especially this
1:35
I mean, look at that. That is down into the fiberglass. So in order to fix these, we're going to need to fare them with something like this
1:41
This is Total Boat, Total Fair, epoxy faring compound. It's a two-part item
1:47
This is paintable. It is not usable with gel coat. So if you're putting it on something like a gel-co finish, you're going to need to use something else
1:55
because gel-coat is a polyester-based item. It's not epoxy based, whereas this is epoxy based so you can paint this, but you can't gel cut over it
2:08
Now, we're going to need to sand all of these down to get them uniform so that we can apply this before we paint it
2:15
and then we going to be using this so that we can blend in our paint and get it to look nice and shiny like we did up here with the top Now I do not want to get into this sticker
2:29
So what I'm going to do is I'm just going to cover this sticker up with tape. So that way I don't have to mess with this
2:34
If your scratches are too bad and your sticker is destroyed, you will need to take the sticker off
2:39
Usually in order to take a sticker off, what you'll do is you'll want to take a heat gun
2:43
and then heat the sticker up and then use a knife to kind of get it started
2:47
and then as you heat it up you can pull the sticker off and then use some rubbing alcohol to get the adhesive off
2:52
But we're not doing that today. We're going to sand all of this down. Put a piece of tape along this line here, this edge, like right there, and then move over to here just for fading purposes with the paint
3:16
I'll probably do this circle like that or along that edge and then over to here
3:20
So I'll just sand this section here and then we'll paint that
3:24
This has all been hit with the 320 so now we can mix up our faring compound to go over all these scratches
3:41
We're going to clean it first with some acetone and just basically take a rag, wipe
3:46
all this down to clean it off and then once it's all wiped off and clean we will
3:50
fare it out with the total fare. So this is just a one-to-one mix about a 15 to 60
4:02
minute working time and then sandable and three to 12 hours. I'm gonna
4:18
I'm gonna I'm we look like after she all been dried up
4:52
Now we just need to hit this again with the 320 and sand all this down
4:56
And as I normally do, I put that stuff on there a little too thick, but now that we've
5:04
got her all sanded down, pretty much all of these are filled in, all these scratches are all
5:09
are going to be gone so now we are ready for paint just need to wipe this thing down with
5:13
acetone and then we can spray it with the paint now that we're all wiped down with
5:19
acetone what we can go ahead and do is take our paint and we're going to go ahead and just
5:23
evenly spray probably like two or three small thin layers this is the first coat that's on there
5:36
you can still kind of see some spots of where we just did some patching and some cleaning, but for the most part, that's just one coat
5:45
Starting to look pretty good all the way rest around. Next two coats will really cover up all those patches
5:55
Now this is the second coat that we've got on here, and now it is really starting to look
6:01
really, really good. You can barely even tell. One thing when the paint is fresh, you can see like these spray lines
6:09
but those will eventually go away once the paint dries and fades in
6:17
And this is the third coast. So we've actually got a nice, good layer all the way around
6:22
Looking really, really good. So I'm going to go ahead and take the tape off now
6:27
since everything is still a little bit wet, and then we'll see what we're looking like with the tape off
6:39
All right, so this is what she's looking like
6:51
It looks like a mirror finish you can clearly see. This looks really, really good, but I do want to just put a coat of wax on here real quick
7:00
to give it a little bit of a shine in to keep all this. You can see how lint and stuff is sticking to it So we going to wax this real quick and then we going to talk about these lines here and the difference in here to there The difference in here to there
7:21
All right, you will notice that this is looking really, really good and that you can barely even tell
7:28
the difference until you get real up close and you notice that you can tell the difference in the
7:34
difference in the colors. Now from afar, obviously, you know, you can tell, but not really
7:40
Especially these lines here, because I want to talk about these. That's kind of the reason why I did it the way I did it
7:45
If you notice this line right here, you can't really even tell. Now when you look at it, you can see there is a lip there
7:54
Now, that lip is pretty easy to get away with, especially on lines like this. We just take our polishing pad, same thing
8:01
and you'll run your polishing pad on there and come back with our
8:09
cowling Shiner so now you see how that line is basically disappeared here on this edge
8:17
that is why you want to go along a edge opposed to like you know back and forth between
8:23
the you know a spot whenever you're having to do a spot on the caling you're going to have these lines right here
8:29
where it's a blatant, like you can see the difference in that
8:33
This line is harder to get away from, and so to get rid of something like this
8:39
you basically have to paint the old cowling. We can sand it a little bit with doing a wet sand
8:44
and then polishing it. That will blend it a little bit, but that's kind of the struggle that you have
8:50
between keeping your stickers and taking all stickers off and repainting the entire cowling
8:57
That's kind of like the big, problem with doing something like this where when you do a whole side like this you can
9:03
tell boom that looks great all the scratches are gone but you can tell the difference in
9:11
the you know the color you can definitely see it down here because it's a lot this is more
9:16
faded but up here you can't tell the difference so that's just something to you think about
9:23
whenever you're doing callings like this it is very difficult to not have to paint the whole
9:27
cowling and that was kind of what I wanted to show you is that you know if you don't paint the whole
9:31
cowling then you're going to have lines like these