0:00
What's going on everybody
0:02
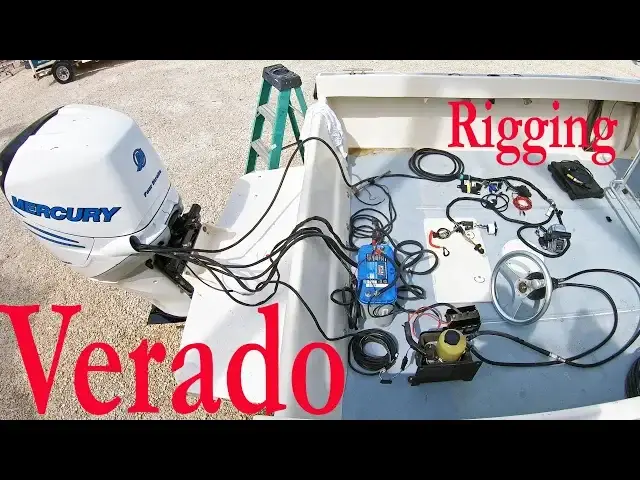
It's Technicians Tuesday. Today you are going to learn all about Mercury Veradoes and how they operate through the rigging
0:09
This week's contest prize is going to be a sweet Mercury Marine dry bag
0:13
So get subscribed for your chance to win and then listen for the Technician's tag
0:17
This week we got our 300 Mercury Verado installed onto our project boat and now we are going
0:22
to show you how to rig this thing up as well as explain in detail how it works
0:28
So if this is your first video with us, you can check out this entire project by clicking
0:32
the card in the top right hand corner of the screen. We just finished up getting the Transom finished and the outboard engine bracket installed
0:40
onto the boat. We already have another video dedicated to mounting an outboard, so we'll skip that process
0:45
today because we have a different issue to deal with. It's our engine
0:49
Just look at how filthy, busted, and junkie looking it is. It's horrible
0:53
You're probably wondering why would you put that dumpy engine onto that boat
0:57
Well, those of you that have seen our video on cleaning and outboard, you know we can fix this
1:03
And just like that, we've got a nice looking engine once again
1:07
Be sure to check out that outboard cleaning video if you'd like to make your engine look like this
1:12
I'll put links to all these other videos in the description below
1:16
But before going over all of the rigging parts, we'll start with some stuff here on the engine
1:21
Behind this chap here, we have the power steering sensor plug that tells the power steering pump to turn on
1:27
Then the clean power plug which supplies power to all of the computers and this plug here that hooks up to all of the boat sensors
1:35
Which is where the fuel gauge sensor plugs into to get the fuel level to display on a digital gauge
1:41
Then we have the negative battery cable or ground post here, the fuel intake port, our 14 pin main harness that sends all of the data to all the controls in the console, and in here we have the positive battery cable post
1:55
Then we have the engine computer here and these two 120-oom terminator resistors
2:01
These are extremely important and there are four of them in this system
2:05
These two and then two more I'll show you in a minute in the helm
2:08
Now we have all of this stuff here. We've got a battery, some battery cables, this automatic power switch for the power steering
2:15
system and what that does is allows the power steering pump to run off of up to three separate
2:21
batteries and it will pull power from whichever battery has the most
2:25
juice in it. And that right there is the power steering pump and this is the
2:29
sensing harness that the engine uses to tell the power steering pump to turn on. Then
2:34
we have the hoses that go from the helm to the steering cylinder that is on the engine
2:38
Now this helm has four separate hoses that go to it Coming from the steering pump we have a return line and a pressure line
2:55
These are marked on the helm with a T for return, a P for pressure, and then an L and an R for
3:01
left and right that goes to the cylinder on the engine. And that's basically it for the steering
3:07
Here we have that clean power harness that has a 5 amp fuse on it
3:11
This hooks directly to the battery and should not go through any battery switch
3:14
switch or on and off switch. You want this directly to the battery because this is what supplies
3:20
power for all of the computers in the system. Now depending on where the batteries are located
3:25
at in the boat, there is also a clean power harness that can go to the junction box that
3:30
hooks into everything that goes in the helm. A factory harness will have that same 5 amp fuse
3:35
in it and you shouldn't ever have to put anything bigger than a 5 amp fuse in it
3:40
Now this is the 14 pin harness that connects our engine to everything in the console by
3:44
connecting to this, which is called a control command module harness, or CCM harness for short
3:51
We'll just call it the console harness to make it easier, though. This hooks directly to that 14-pin boat harness and has these other two Terminator resistors
4:00
we talked about earlier on it. It also hooks up to this computer here, which is called the Control Command Module or CCM
4:08
We'll just call it the console computer to make it easier. This computer receives and sends different commands to the end
4:14
engine computer. So when you move the control box handle, the control box tells this computer
4:20
what to make the engine do. It's important to note that this has an orange mark on it and it has
4:26
a version number on it as well. These numbers are extremely important. This orange mark and
4:32
version has to match the mark and version of the computer that is on the engine. If it doesn't
4:38
then you will have difficulty calibrating the system and depending on the versions
4:42
most of them will not work at all if they are mismatched. Back to our console harness here, it will connect to our key switch, as well as a start-stop
4:51
button, the kill switch or stop lanyard, as well as an accessory harness that will let us
4:57
hook up to and supply key on power to different things. Usually stuff like an auto-retracting trim tab system or something else that we only want
5:06
to have power while the key switch is turned on. Then last but not least, we have the control box
5:12
This usually has a can pad with more buttons on it, like start stop and neutral only
5:18
It also has the trim button on it as well. Now that is all of the stuff that needs to be hooked up in order to make this engine run
5:26
So let's get all this stuff hooked up. We'll start back here on the engine and all this stuff is basically plug and play
5:33
We just plug together our steering harness the clean power and then our boat harness for the fuel sender
5:52
Then on this 14 pin, if you look at the plug, it has this black mark on it, and that lines up with this slot here
6:00
Both plugs have this black mark and will line them up and push them together
6:04
Now we just have to hook up the power cables and the only thing left that the engine needs is for the fuel line to be hooked up
6:16
Just a quick tip on putting these calings on, you want to make sure that these little pieces of the back caling are on the outside when the handle is latched
6:26
Then on this top cowling you'll see this bracket here, we are going to set that bracket on this pin here that is on the latch
6:33
that is on the latch. We will stick our hand on that bracket so that we can feel it
6:43
Then we can guide it onto that pin on the latch. We'll set the calling down on the pin and just set it down and push it down so that the latches latch in the back
6:52
We'll move onto the inside here now and start by hooking up some power
6:57
We'll put our clean power on, then our battery cables, as well as hook up the ground for our power steering pump
7:03
Then we'll take the power for the steering pump and hook that up to the automatic switch
7:17
We'll then supply power to that switch from the battery and we can hook up the rest of our positive cables
7:24
being the clean power and the battery positive cable. This will end up with our battery only having those items on it
7:31
and we can then hook up our sensor wire to the power steering pump that has this little box here that that wire will plug into
7:39
This is basically it for the power and steering system. Let's hook up all the electrical stuff that goes into console next before hooking up the steering helm
7:48
Remember our black markings here on the 14 pin harnesses. We'll connect these two together and then we'll stick our console computer onto the harness
7:56
Then we can connect to our junction box or J box for short. We'll hook up our accessory harness for our auto retracting trim tabs, and then if we needed to, we can hook up our clean power to the J-box
8:09
Each engine only needs to have one of these harnesses, so don't hook up two of them if you rig one of these systems up
8:15
This is just for visual purposes. This J-box is where the tachometer or speedometer gauges will hook up to as well
8:22
We got our kill switch next along with the key switch and then the start stop button if you want one
8:39
Notice that most of this stuff is all plug and play and is labeled really well
8:44
The last thing we have to hook up is the control box. Now a quick tip if you have a dual control box, the plug that has the trim wire plug with
8:52
it, that will always go to the port hands. handle. We'll push the clip in and then tighten the clip that keeps the tension off of the plug
9:00
Then just hook up the trim button and the can pad and we are almost done. We've got to
9:05
configure the system still and hook up the hoses to the steering helm, but this is all the
9:10
components on a mercury vera-vrato digital throttle and shift system. For the fuel sender, we just need
9:16
the fuel sender ground to go to the same ground as the engine. And then we have on this harness a plug
9:22
for boat sensors like speed, depth, and other stuff that really isn't used that much anymore
9:27
Then we have these two wires, the pink and blue. The pink is number one and the blue is number two
9:33
You can then tell the gauge what the sensor is reading, whether it be fuel, water, or anything else
9:40
If you want to be in the contest for the dry bag, just make sure you are subscribed to the channel
9:45
follow us on Instagram, drop a comment below and include a hashtag TyWy Mercury
9:50
Now let's configure the system. For this, we have to start by telling everything where it's at
9:59
meaning setting the engine location and console computer location. If there is more than one engine, it lets all of the computers know where they are
10:08
This way, Port Engine knows that it is port, and Starbird knows that it is Starboard
10:13
We just have to turn the key on, place the control and reverse wide-open throttle
10:18
and let the computer know it's there. Then we'll put the handle back in neutral and turn the key switch off
10:29
We'll put the control box in reverse wide open throttle once more
10:33
What this does is it turns everything off. The computers will feed power across the network for 15 minutes after the key is turned off
10:42
so that the trim function will still work. But putting the control box handles in reverse wide open throttle will tell everything to turn off
10:49
Now we just have to adapt the handle by going through all of the lever positions and letting the computers know they are there
10:56
We go through reverse wide open, reverse detent, neutral detent, forward detent, and wide open throttle
11:05
And now our digital throttle and shift system is all set up and you know exactly how it works
11:11
Don't forget to smash that like button and we look forward to seeing you next week