0:00
The first thing that we need to do when testing a radio is get power to it
0:04
Two different ways that you can do this. One, you can get a battery, and you can take your negative lead and run it to our black wire, which is our negative
0:11
And then we'll also have a red wire, which is going to be positive. Some radios will have a yellow wire that is going to be an illumination wire
0:19
Sometimes they are reverse. Sometimes the red is constant, and the yellow is illumination
0:24
And sometimes the yellow is constant, and the red is illumination. But we can just take our red wire and we're going to hook it to our battery
0:33
If you do not have a battery, then you need to go to Goodwill, a thrift store
0:37
It doesn't really matter. Get something with a plug that looks like that that plugs into the wall
0:42
It's called an AC adapter. As you can see right here, AC adapter
0:47
As long as it has that plug, this adapts AC to DC. You will then just cut the wire off of the end of it, plug it into the wall
0:56
and then you will get two wires on the end of them. Make sure you know which is positive, which is negative
1:01
Hook it up to your meter. If it's negative, it will have a negative mark there. But you can see we've got 14 volts here
1:07
which is DC power that will turn our radio on. Once you get our radio hooked up to power
1:13
we can turn it on and see if it lights up. As you can see, this thing is now litting lit up
1:20
and I've actually got this plugged into my phone. So we know that the radio comes on
1:26
And it works like that. We can then go ahead and hit the modes, kind of go and switch through AM, auxiliary, and what not to see as long as it'll hook up
1:36
For me, I'm going to try and make sure I get the Bluetooth going. So I am hooked up to my phone
1:41
And then what we're going to actually do is we want to play a signal
1:44
So we're going to be playing a 1,000 hertz test tone. You want to click that one
1:51
I like using the one from Sonic Electronics. There also ones that go from left to right but it a pretty good thing I hooked up to Bluetooth It attached to here playing that 1 Hertz Now when it comes to figuring out which is which the gray and the white wires
2:09
are usually the front left and right speakers. Most of them will have labels on them. So you can see how
2:15
that says front left. That is going to be usually how it is. Gray and white are the front, green and
2:21
purple or the back and then we're going to have one is going to have a black line on it and the one
2:27
that has the black line generally is going to be the negative but again it will say negative or positive
2:32
and what we're going to do to see if it is putting out to our speakers is we need to hook this up to
2:38
our meter so with this still playing we're going to hook up to our meter and we're going to change
2:44
to AC volts AC so right now it is putting out 0.086 volts
2:50
volts and we're just going to take our radio we're going to turn the volume up and see if our voltage goes up
3:00
as it is so if i go all the way up this thing goes to 45 we've got 2.6 volts coming out of our speaker on our rear so now we can just go through each one of the
3:13
speakers and make sure as we turn the volume up and down our voltage is also going to be changing with that
3:20
and make sure you are on volts AC. So once I get all the way to zero
3:24
I got zero volts coming out. That means that that speaker is actually playing
3:28
This radio is going to be able to play one speaker. And we will just test each and every speaker in the same fashion
3:34
And if you wanted to test it with a speaker, you could also test it with a speaker by just taking the wires
3:40
and putting it to the speaker. Which obviously this speaker is trash
3:50
so there is that. Now, when it comes to testing the rest of this stuff
3:56
one if you want to test your USB port you going to just hook up a USB to it and see if it has power For me looking at this USB it might work
4:09
but I'm not gonna put any of my USB things in there because this is rusty and nasty looking
4:14
Actually, let me clean that up and I'll put something in there. We're going to plug a USB in
4:19
and then we're going to plug something in to see if we can get power
4:24
And it looks like it's charging the phone, so that means our USB port is also working
4:31
Now, when it comes to testing the other stuff on here, that's going to be how you're going to test the auxiliary in, which are all going to have, you know, it's going to say auxiliary in, just like that
4:47
You're going to hook up something to that. I don't have anything that tests auxiliary, so there's nothing that I can really do there
4:54
And if we wanted to see if our radio was working, then we just need to hook up an antenna to make sure that work
4:59
That's why it keeps one on deck like this. It's just a cheap little antenna that I can plug in here
5:08
Got it hooked up to a speaker. Obviously, that's too loud. Now, how do I get off of..
5:15
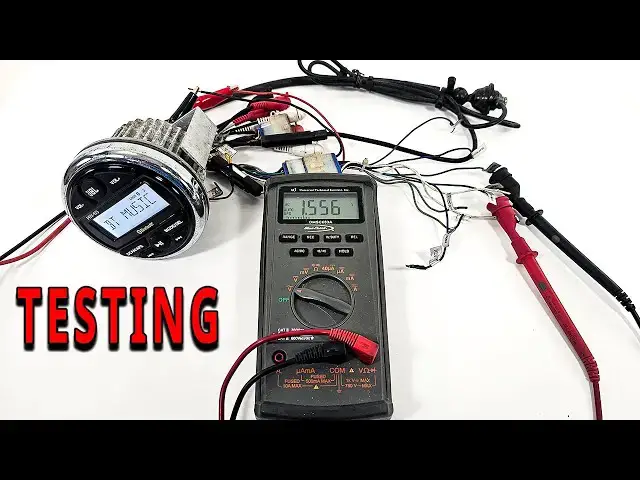
There we go. FM, scan. So, looks like the radio does work, the AMFM
5:54
Okay so now we know that the radio works and that the scanner works so pretty much everything is working on the radio but we need to check two more things to make sure that the radio is not a problem if you have a problem with your stereo And that is going to be our remote out which is going to be this blue wire Now this blue wire is for the amplifier and that is what going to tell the amp to turn on which is pretty easy to test this This is going to just be a voltage test and we need to just pretty much make sure that it is getting power So
6:27
So here all we need to do is check for 12 volts on the remote wire
6:33
And as you can see on a remote wire, our blue wire coming out, we've got power or regular positive, our ground hooked up, and we are seeing 12 volts
6:43
So that means that it is sending 12 volts to the amp to tell the amp to turn on
6:48
Now the last thing that we need to check to make sure the radio is fully functioning is the RCA outputs
6:53
So if you look here, some of these are going to say rear line out or it might say sub out or something like that
7:01
But these are the outputs that are going to send Low voltage to your amplifier and we need to
7:10
undo these all you need to do to remember on RCA plugs is that the middle is going to be positive and the outside is going to be ground and
7:20
We are not checking for 12 volts, but we are checking for AC voltage. So we got point three right there. If I turn the radio up, we should see the voltage go up
7:35
And if I turn the radio down, we'll see the voltage go down. And it's going to depend on what you're
7:41
actually playing as well. So if you play music, it's going to have a better signal depending on what
7:49
you're trying to play. But again, when you go down with it, though, the same. The same thing, the
7:53
signal's going to go down as well. And now all you have to do is check the other
7:57
RCA's, any of them that is an RCA out, and then you will know if your radio is functioning